Add the Widget Code to Your Website
Embed the JIVIQ script immediately before the closing </body> tag in your HTML or CMS code settings. Follow our step-by-step Nexora AI implementation.
Install JIVIQ
Overview & 9-step roadmap
Review →Add Domain
Domain allow-listing & rules
Review →Copy Code
Obtain your workspace script
Review →Embed Code
Placement before </body>
Currently ReadingVerify Widget
Test live chat & inbox
Next →1. The Golden Rule: Paste Before </body>
To install JIVIQ on any website, paste the script copied in Step 3: Copy the JIVIQ Widget Code immediately before the closing </body> tag of your web page.
<!DOCTYPE html>
<html lang="en">
  <head>
    <title>My Company Website</title>
  </head>
  <body>
    <!-- Main Website Content (Header, Hero, Main, Footer) -->
    <header>...</header>
    <main>...</main>
    <footer>...</footer>

    <!-- JIVIQ Live Chat Widget Script -->
    <script
      src="https://widget.jiviq.com/v1.js"
      data-tenant="your-business"
      data-capability="your-workspace-id"
      data-launcher-color="#000666"
      data-position="bottom-right"
      data-icon="chat"
      async defer>
    </script>
  </body>
</html>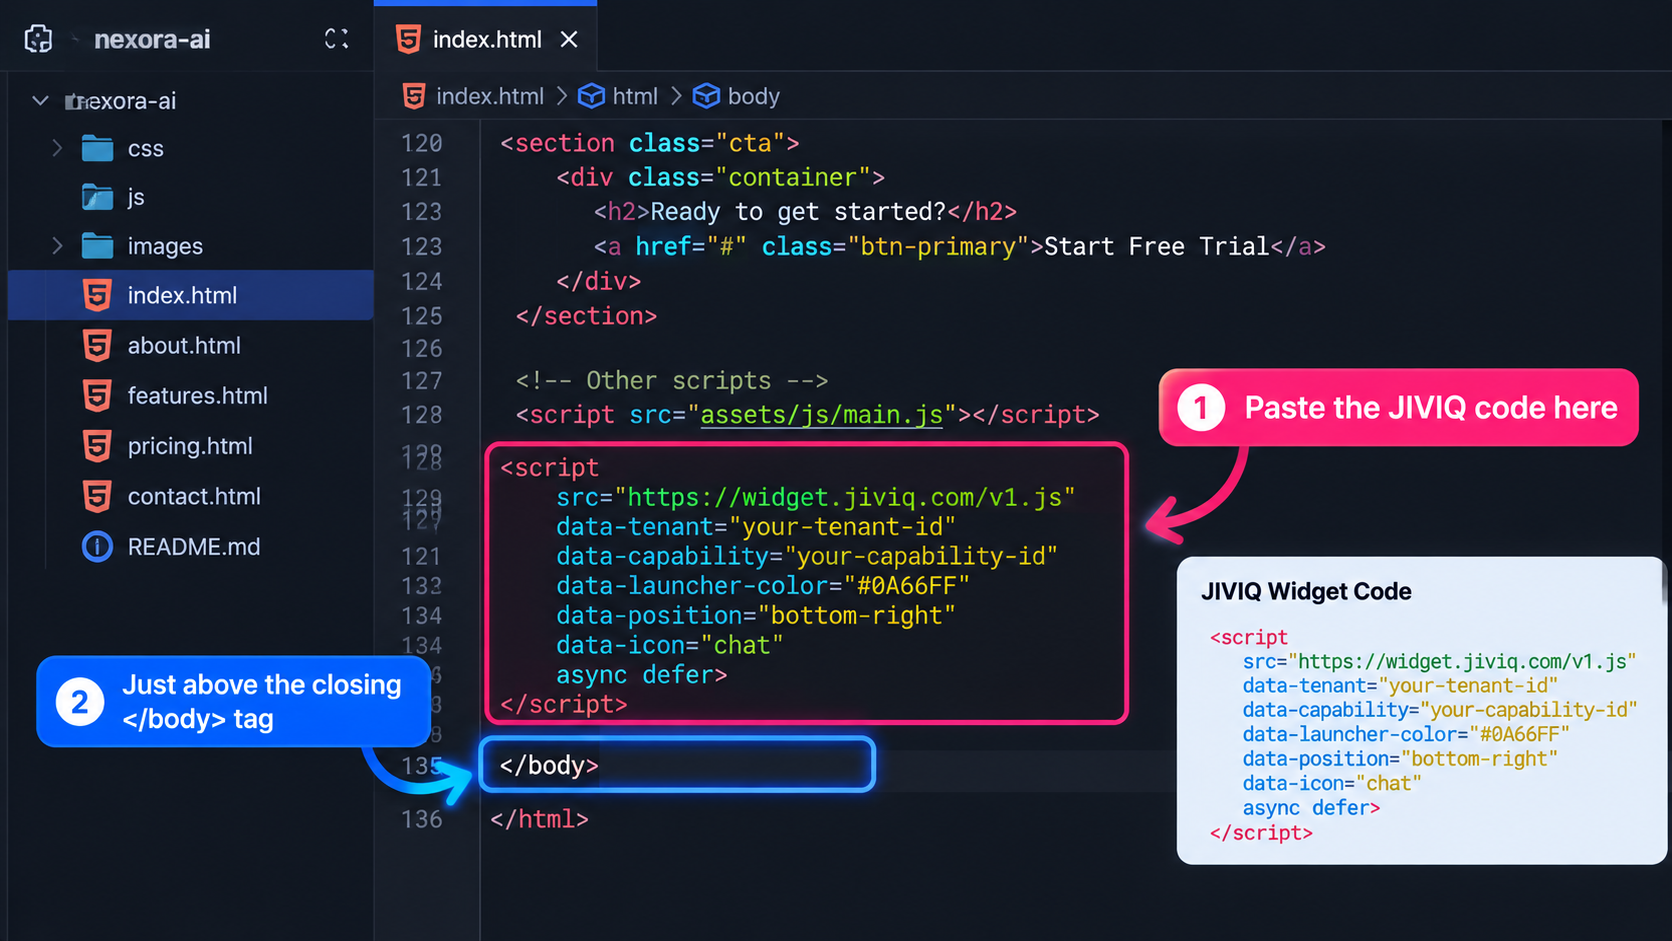
2. Why </body> Placement Matters
Web browsers parse and construct HTML pages from top to bottom. Placing JavaScript scripts at the very bottom of the document body offers significant performance and usability benefits:
Zero Render Blocking
Your HTML text, styling, hero images, and navigation render immediately for visitors without waiting for chat initialization.
DOM Readiness
Ensures the Document Object Model (DOM) is fully structured before JIVIQ mounts the floating chat launcher container.
3. Standard HTML Websites Guide
If your website is built with plain HTML, static site generators, or framework build tools:
Launch your code editor (e.g., VS Code, Sublime Text, or GitHub Web Editor) and open your project repository.
Open your index.html (or root layout file like Layout.astro or app/layout.tsx). Scroll to the bottom and find </body>.
Create a new line immediately above </body> and paste your copied JIVIQ script.
Save the file, run your build command if applicable, and deploy your site to your hosting provider.
4. CMS Platforms: WordPress, Webflow, Shopify
If your website is managed via a Content Management System (CMS), use the platform’s custom code or footer injection settings:
| Platform | Recommended Method | Location in Dashboard |
|---|---|---|
| WordPress | WPCode Plugin or Child Theme | WPCode → Add Snippet → Header/Footer → Footer (before </body>) |
| Webflow | Custom Code Settings | Project Settings → Custom Code → Footer Code (before </body> tag) |
| Shopify | Theme Liquid Editor | Online Store → Themes → Edit code → layout/theme.liquid (before </body>) |
| Squarespace | Code Injection (Business/Commerce) | Settings → Advanced → Code Injection → Footer |
| Google Tag Manager | Custom HTML Tag | Tags → New → Custom HTML → Trigger: All Pages - Page View |
5. Practical Tutorial: Installing on Nexora AI
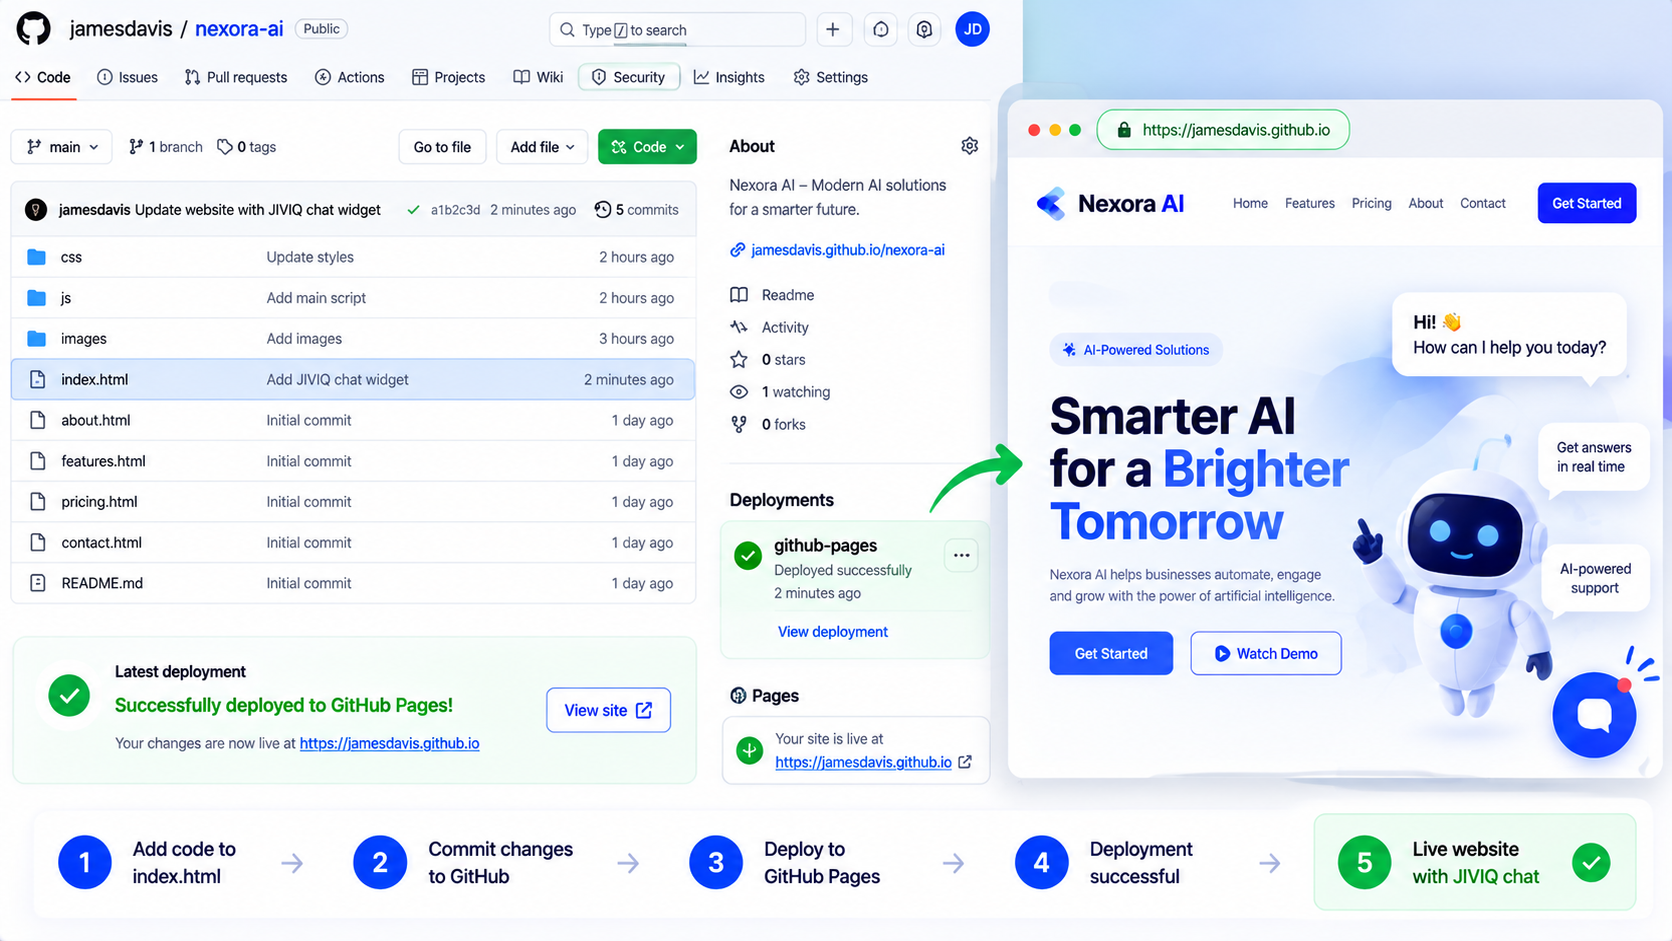
Let’s examine how we completed and tested this exact installation on our live reference website, Nexora AI:
1. Opened index.html
Located the closing </body> tag in the repository root markup.
2. Committed & Pushed
Committed changes to GitHub and verified live deployment via GitHub Pages.
6. Visual Code Placement Walkthrough
Visual code editor references illustrating script placement across standard HTML environments:
7. Frequently Asked Questions
Detailed questions and answers on code embedding, CMS plugins, and publishing best practices:
Paste the JIVIQ script tag immediately before the closing </body> tag at the bottom of your HTML document. This ensures all visual page elements load without delay before the chat bubble mounts.
While the script has async and defer attributes allowing it to run from <head>, placing it before </body> is best practice for fast Largest Contentful Paint (LCP) and universal CMS compatibility.
For multi-page static websites, paste it before </body> on every page where you want chat available. For CMS platforms (like WordPress or Webflow), adding it to your global footer template covers all pages automatically.
Use a lightweight code injection plugin (such as 'WPCode' or 'Header and Footer Scripts'). Paste the JIVIQ code into the 'Footer (before </body>)' box and save changes.
Yes. In your WordPress admin, go to Appearance → Theme File Editor, open footer.php in your child theme, and paste the JIVIQ snippet directly before the </body> tag.
If you used a code manager plugin or a child theme, updates will not overwrite your script. If you edited a parent theme directly, you must re-add the code after theme updates.
Go to Project Settings → Custom Code, paste the JIVIQ snippet into the 'Footer Code (before </body> tag)' textarea, and click Save Changes and Publish.
In Shopify Admin, go to Online Store → Themes → Edit code. Open theme.liquid in the Layout folder, scroll to the bottom, paste the script before </body>, and click Save.
Yes. Create a new 'Custom HTML' tag in GTM, paste your JIVIQ script, set the trigger to 'All Pages - Page View' or 'DOM Ready', and publish the GTM container.
Nexora AI is a static showcase website hosted on GitHub Pages. The JIVIQ script was pasted before </body> in its index.html file, committed to git, and pushed to GitHub.
No. GitHub Pages is simply the hosting platform used for our live Nexora AI tutorial demonstration. JIVIQ works on any standard web hosting provider.
Yes. For framework-based websites, add the script to your root layout component (e.g., Layout.astro or app/layout.tsx), run your build command, and deploy to your hosting provider.
Check that: (1) your changes were actually published/deployed, (2) you cleared your browser cache (Cmd+Shift+R or Ctrl+F5), and (3) your domain is allow-listed in JIVIQ under Chat Studio → Install.
HTML5 custom data-* attributes (like data-tenant and data-capability) are fully valid HTML5 standards. Some strict linters require quotes around all values.
Yes. If your website has a strict CSP header, you must allow 'https://widget.jiviq.com' in your script-src and connect-src directives.