Verify the JIVIQ Widget Installation
Validate your live chat widget installation. Test customer messaging, verify AI responses, confirm inbox routing, and troubleshoot common setup issues.
Install JIVIQ
Overview & 9-step roadmap
Review →Add Domain
Domain allow-listing & rules
Review →Copy Code
Obtain your workspace script
Review →Embed Code
Placement before </body>
Review →Verify Widget
Test live chat & inbox
Currently Reading1. The 9-Step Verification Checklist
After pasting your widget code and publishing your website (as covered in Step 4), execute this rigorous verification sequence to confirm that everything is working perfectly:
Open Your Live Website URL
Open a new browser window and navigate to your production website (e.g., https://yourcompany.com or https://jamesdavis.github.io/nexora-ai/).
Perform a Hard Page Refresh
Bypass local browser cache by pressing Ctrl + F5 (Windows) or Cmd + Shift + R (Mac).
Locate the Floating Launcher Icon
Confirm that the circular JIVIQ chat bubble appears in your configured corner (default is bottom-right).
Click the Launcher to Open Chat
Click the bubble icon. The chat window should smoothly expand into view, displaying your workspace header and welcome prompt.
Send a Test Greeting Message
Type a realistic customer query into the input field, such as: "Hello! Can you tell me about your pricing plans?" and press Enter.
Confirm the AI Response
Verify that JIVIQ's AI responder generates an accurate, formatted reply based on your workspace knowledge base and persona settings.
Open the JIVIQ Admin Dashboard
In a separate tab, open app.jiviq.com and navigate to your active Workspace.
Check Conversations / Inbox
Click Inbox or Conversations in the sidebar. Verify that your test conversation appears in the active thread list in real time.
Mark Test Thread as Resolved
Confirm that the conversation transcript, visitor metadata, and timestamps are recorded accurately, then close or archive the test thread.
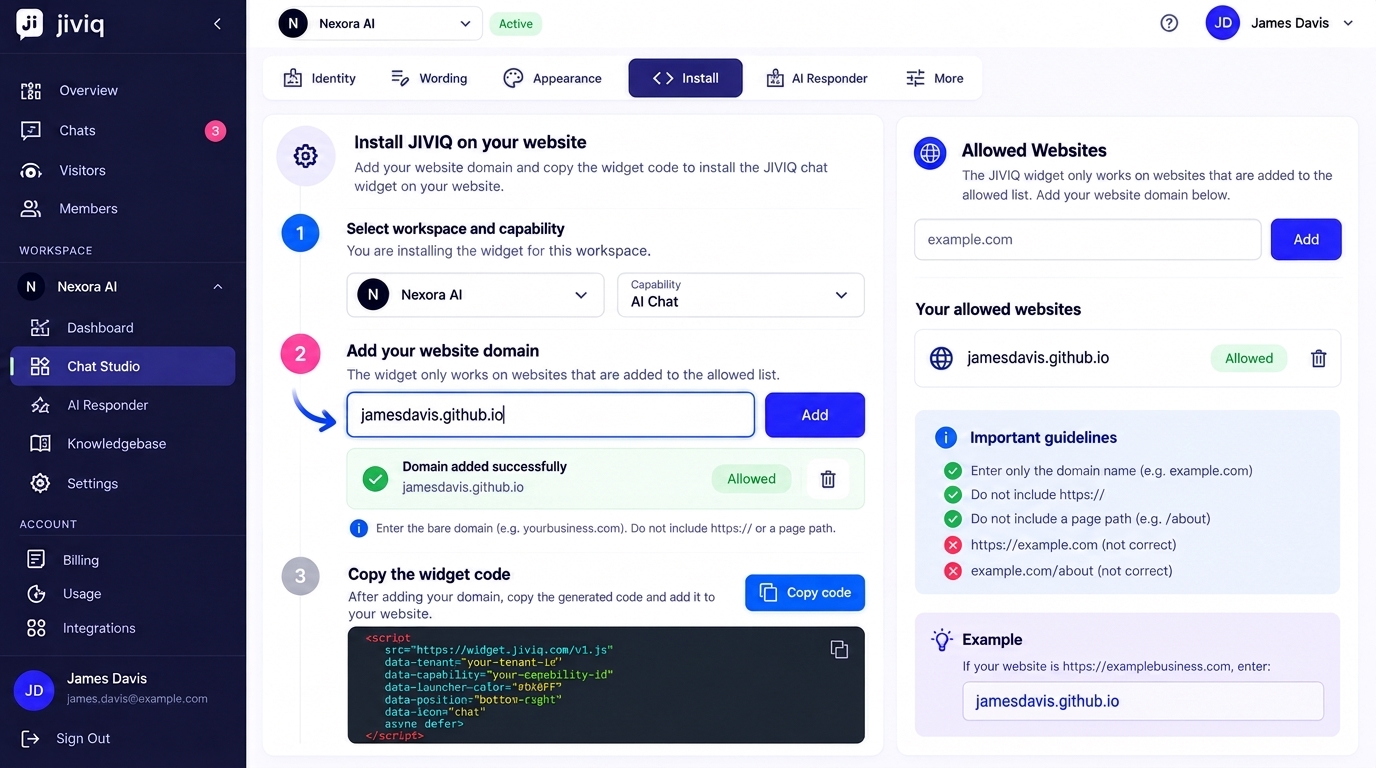
jamesdavis.github.io with active HTTPS status. 2. Testing Live Chat & AI Responses
When validating the frontend chat experience, verify that the assistant interacts according to your configured AI Mode (Autopilot vs. Copilot):
Autopilot Mode Verification
The AI answers immediately in under 3 seconds using verified documentation context without waiting for team approval.
Copilot / Draft Verification
The conversation queues in your JIVIQ Inbox with an AI-generated draft awaiting human agent approval before sending to the visitor.
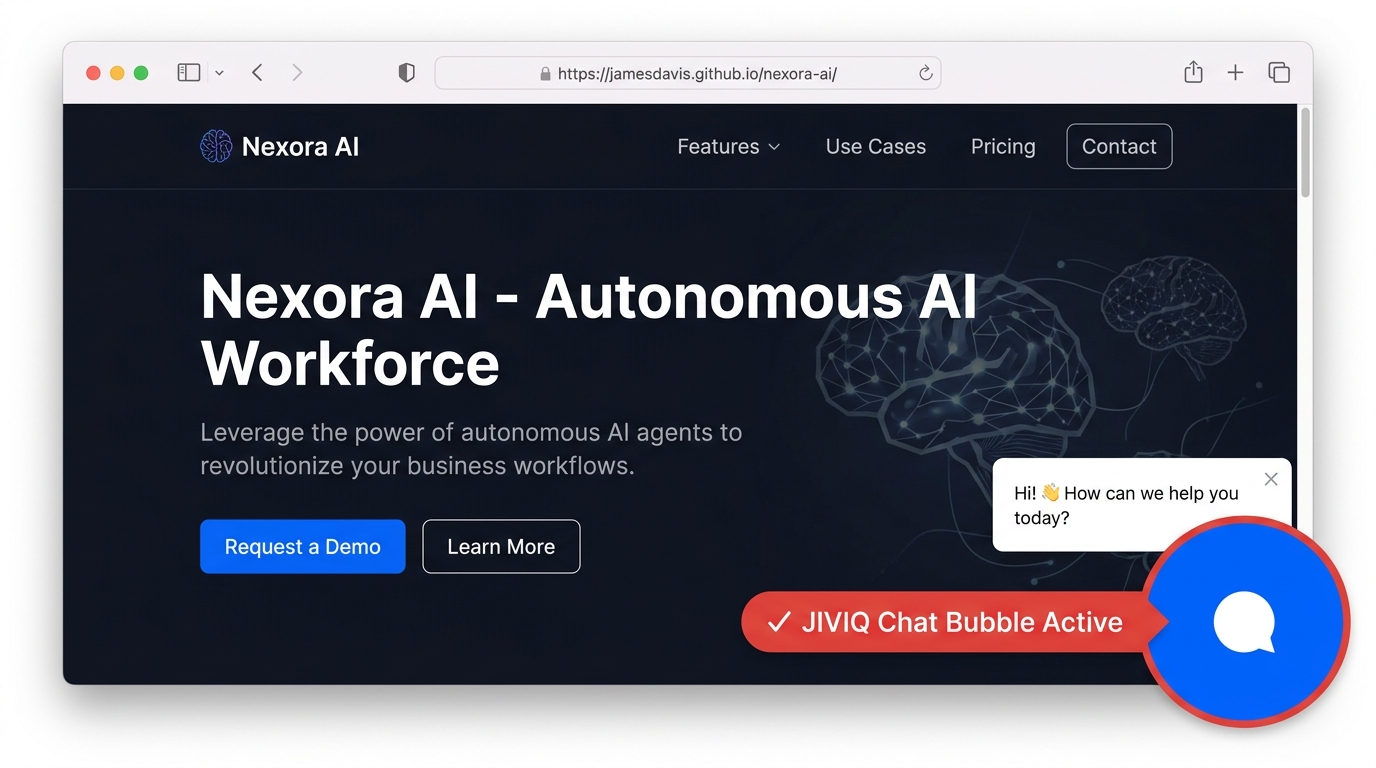
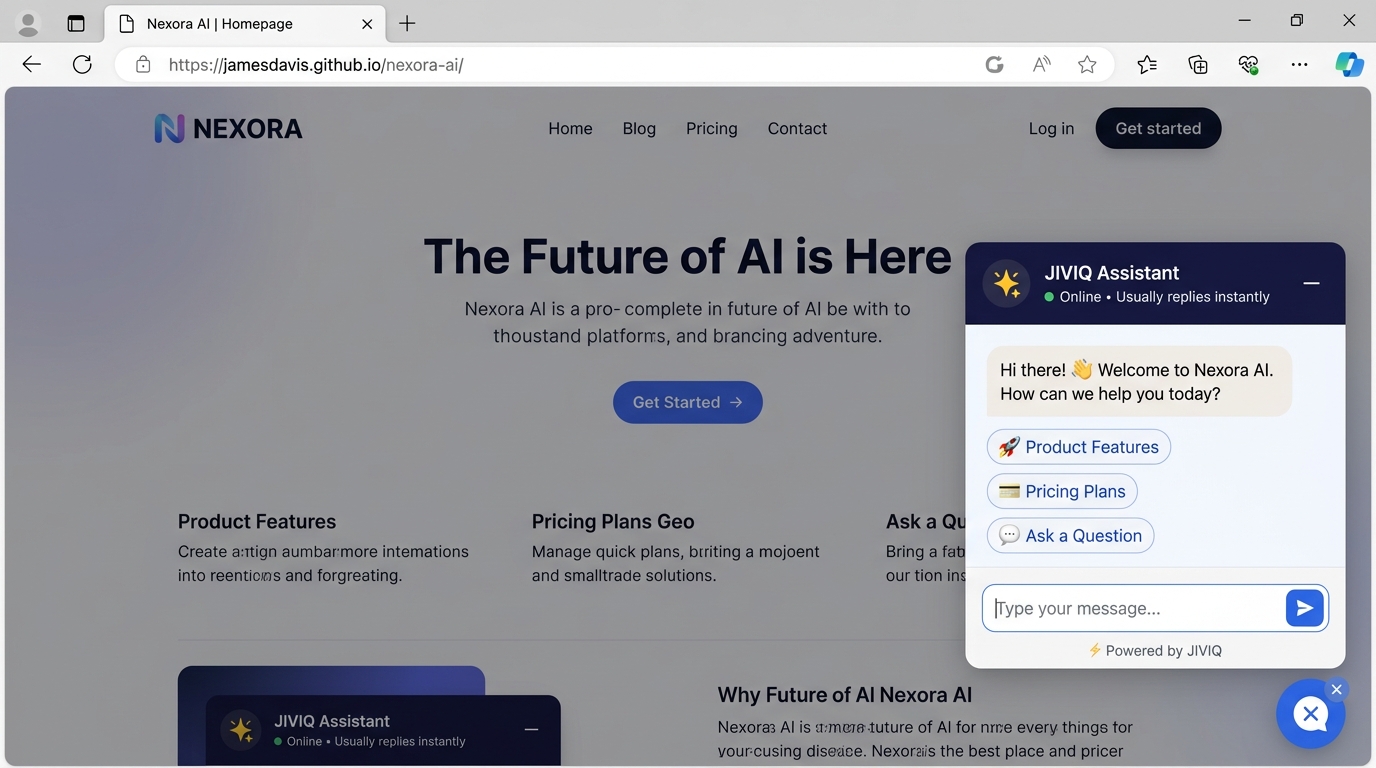
3. Checking the JIVIQ Admin Inbox
Your JIVIQ Inbox (app.jiviq.com) provides complete real-time visibility into visitor interactions across all your authorized websites:
- Origin Domain: Shows the exact hostname where the message was initiated.
- AI Confidence Score: Displays knowledge base source citations and response confidence.
- Human Takeover: Allows any team member to join the thread seamlessly with one click.
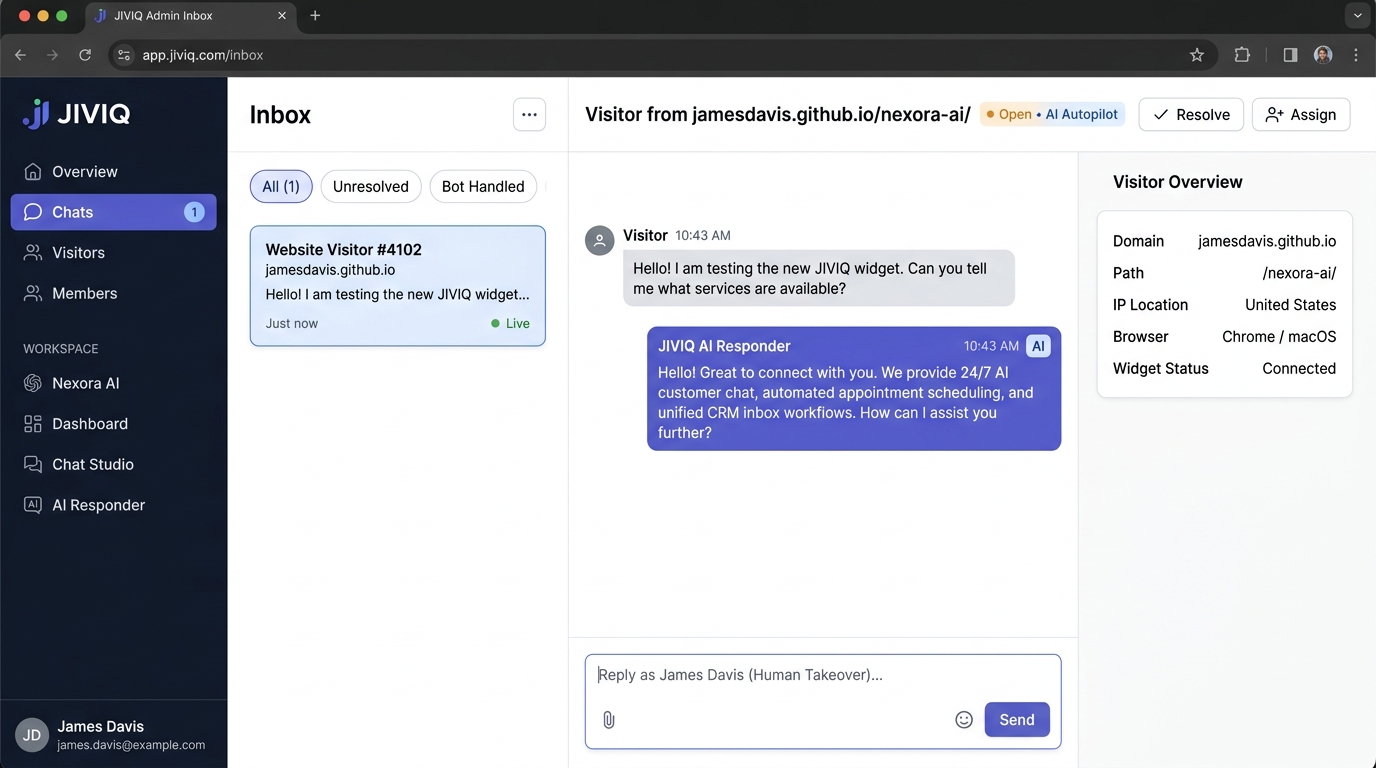
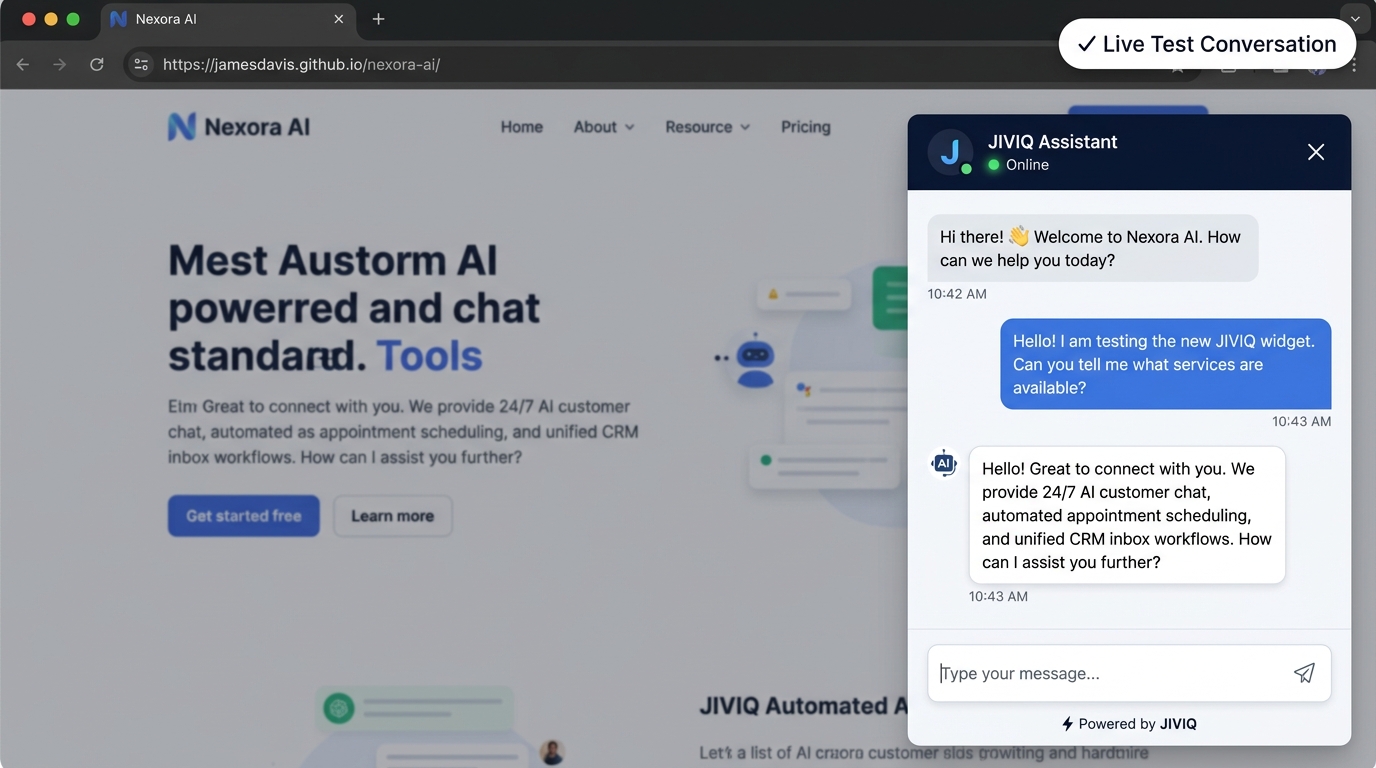
4. Verified Case Study: Nexora AI Live Test
Here is how we verified our live showcase installation on Nexora AI (https://jamesdavis.github.io/nexora-ai/):
5. Comprehensive Troubleshooting Guide
If your widget does not appear or behaves unexpectedly during verification, check these common root causes and immediate solutions:
1. Widget Does Not Appear
Cause: Script tag missing in HTML, changes not published, or aggressive browser cache.
Fix: Check page source (Right-click → View Page Source) to confirm the <script> tag is present before </body>. Clear browser cache.
2. Domain Not Allowed Error
Cause: Host domain is not registered in JIVIQ under Chat Studio → Install.
Fix: Add bare domain (e.g., yourdomain.com) in the JIVIQ allowed websites table.
3. Content Security Policy (CSP) Block
Cause: Strict CSP headers blocking external CDN scripts.
Fix: Add https://widget.jiviq.com to script-src and connect-src directives.
4. Wrong Workspace Credentials
Cause: Pasted snippet from wrong workspace or sample project (like Nexora AI demo keys).
Fix: Copy the exact script from your own active JIVIQ Workspace dashboard.
6. Visual Verification Walkthrough
Review these visual verification milestones from the live Nexora AI deployment:
jamesdavis.github.io authorized with active HTTPS status. 7. Frequently Asked Questions
Browse questions by category to learn all about testing and verifying your JIVIQ installation:
A successful installation is confirmed when: (1) the floating chat bubble renders in your configured corner, (2) clicking it opens the chat modal without errors, and (3) a test message receives an automated AI response and appears in your JIVIQ admin inbox at app.jiviq.com.
The widget appears immediately upon page reload as long as your hosting provider has finished deploying your HTML and your browser cache has refreshed.
Log in to app.jiviq.com, select your Workspace, and click 'Inbox' or 'Conversations'. All test messages sent via your live widget will appear in real time under the Active queue.
Check three things: (1) Is your bare domain added under Chat Studio → Install? (2) Is the script tag pasted immediately before </body>? (3) Did you perform a hard cache refresh (Cmd+Shift+R / Ctrl+F5)?
Some aggressive privacy extensions block scripts. Test your live website in an Incognito / Private browsing window or on a mobile device without ad blockers.
If your website has a sticky cookie banner or fixed bottom navigation bar, adjust the z-index or change the launcher anchor position to 'bottom-left' in Chat Studio.
This indicates that the domain in your browser's address bar is not in your Workspace allow-list. Ensure you registered the bare domain (e.g., yourdomain.com or *.yourdomain.com) without https://.
If typing yoursite.com redirects visitors to www.yoursite.com, you must register both 'yoursite.com' and 'www.yoursite.com' (or use '*.yoursite.com') in your JIVIQ allowed websites table.
No. Local file system URLs (file:///C:/index.html) cannot perform cross-origin network handshakes. You must host the file on a local web server or public staging domain.
Verify that your AI Responder is enabled and set to Autopilot or Copilot under Workspace Settings → AI Responder. Ensure your knowledge base has at least one published source.
Yes. In the JIVIQ admin inbox, open the active test conversation and type a response from the agent composer to confirm bidirectional real-time messaging.
Test messages count towards normal workspace message volume. You can mark test threads as resolved or archive them in the inbox once testing is complete.
Add 'https://widget.jiviq.com' and 'https://api.jiviq.com' to your 'script-src', 'connect-src', and 'style-src' headers to allow script execution and WebSocket connections.
JIVIQ uses anonymous local session tokens in localStorage/sessionStorage to preserve chat history across page navigation without third-party tracking cookies.
Email our engineering team at support@jiviq.com with your website URL and a screenshot of your browser developer console.