Add Your Website Domain
Authorize your website domain in JIVIQ to activate origin security and enable widget communication on your live web pages.
Install JIVIQ
Overview & 9-step roadmap
Review →Add Domain
Domain allow-listing & rules
Currently ReadingCopy Code
Obtain your workspace script
Next →Embed Code
Placement before </body>
Next →Verify Widget
Test live chat & inbox
View →1. Why JIVIQ Requires Domain Allow-Listing
Before the JIVIQ chat widget can load or answer questions on your website, your website domain must be registered in your JIVIQ Workspace under Allowed Websites.
JIVIQ implements strict Cross-Origin Security (CORS) and origin validation. When a visitor loads your webpage, the widget script checks the hostname against your account's authorized domain list. If the domain is recognized, the chat bubble renders and connects securely to your AI responder.
Because client-side widget code is public on the web, domain allow-listing prevents unauthorized third parties or malicious copycats from pasting your widget script on their own websites and consuming your AI response quota.
Quota Security
Ensures only verified visitors on your approved domains can initiate AI conversations and utilize workspace messages.
Origin Authentication
Validates request headers in real-time across JIVIQ edge nodes before serving your brand’s custom chat persona.
Session Isolation
Guarantees visitor leads and CRM attributes captured on your site are routed strictly to your own secure workspace database.
Multi-Domain Routing
Connect multiple domains or wildcard subdomains under one unified knowledge and AI assistant umbrella.
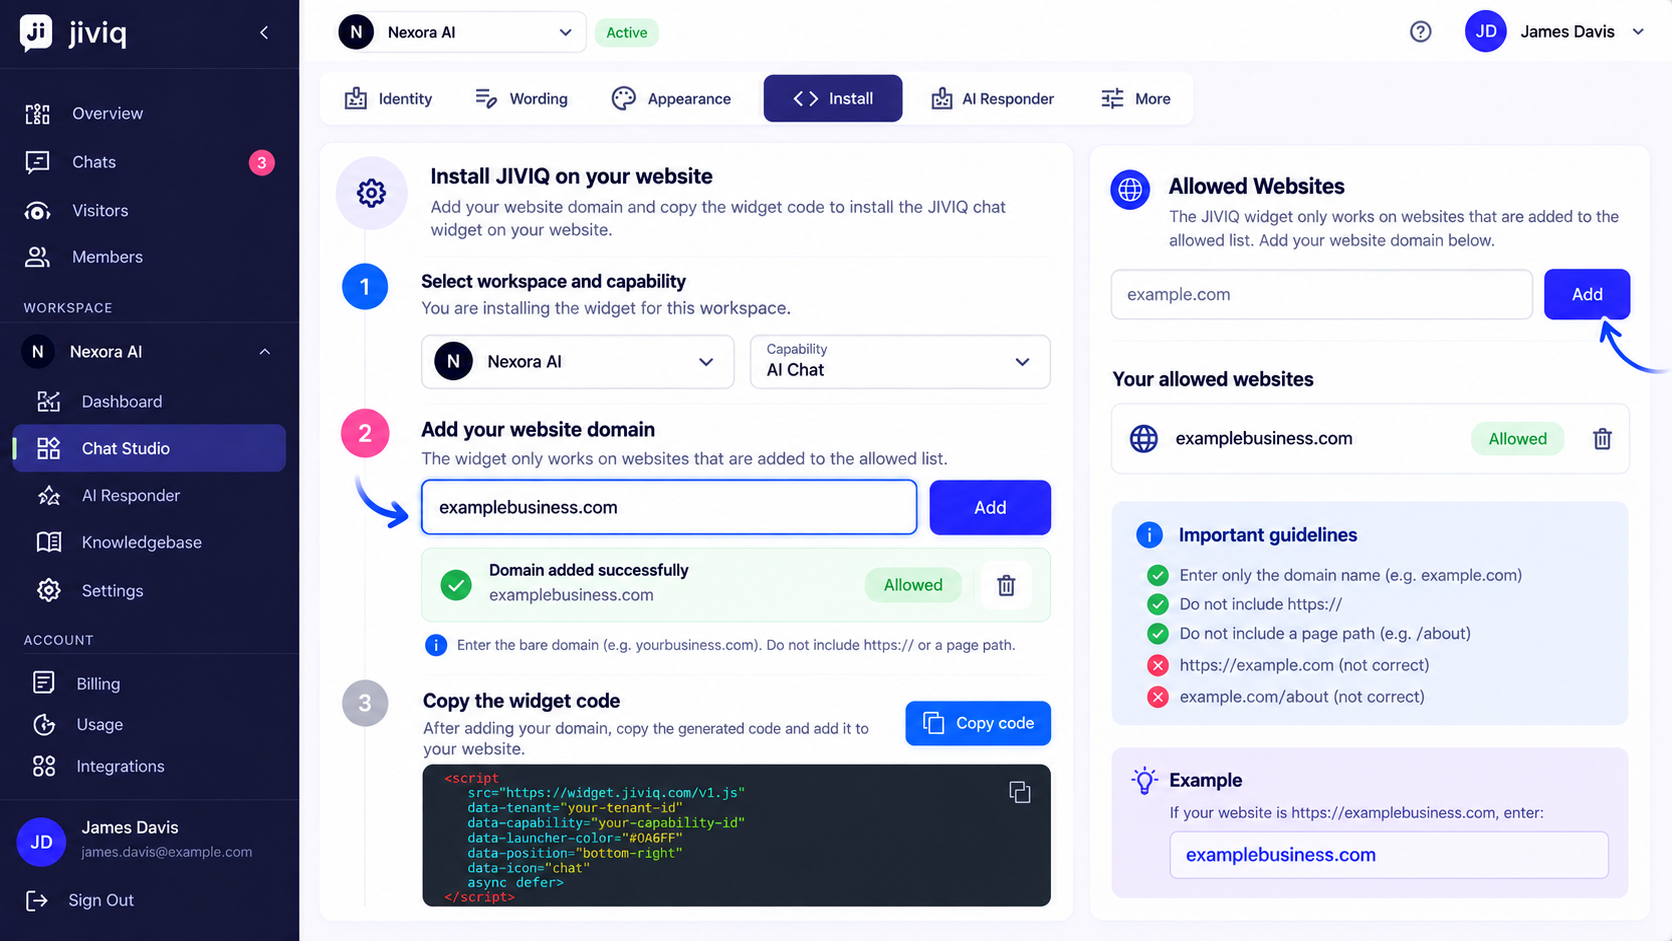
2. Domain vs. URL: Critical Formatting Rules
The most common installation mistake is entering a complete web address (URL) instead of a bare domain name. JIVIQ expects the hostname only.
| Type | Example Format | Valid in JIVIQ? | Explanation |
|---|---|---|---|
| Bare Domain | example.com | check VALID | Standard apex domain. Covers the entire domain across all sub-paths. |
| Subdomain | app.example.com | check VALID | Authorizes a specific subdomain for portal or SaaS app integration. |
| Wildcard Subdomain | *.example.com | check VALID | Authorizes all subdomains (blog., store., app., www.) simultaneously. |
| Full URL with Protocol | https://example.com | close INVALID | Do not include https:// or http://. |
| URL with Page Path | example.com/pricing | close INVALID | Do not include page paths or subfolders. |
| Local / Private Address | localhost / 127.0.0.1 | close INVALID | Localhost cannot be verified by JIVIQ production edge servers. |
Ensure you do not include a trailing slash (example.com/) when typing or pasting into the domain input field. Bare domain characters provide the smoothest verification.
3. Practical Example: Authorizing Nexora AI
Throughout this tutorial series, we reference our verified installation on Nexora AI, a real static website hosted on GitHub Pages:
Incorrect Input
https://jamesdavis.github.io/nexora-ai/ Contains protocol (https://) and repository sub-path (/nexora-ai/). This will cause a validation error.
Correct Input
jamesdavis.github.io Bare host domain only. Authorizes the JIVIQ widget across all GitHub Pages hosted on this root account.
4. Step-by-Step: Adding Your Domain in JIVIQ
Follow these simple steps inside your JIVIQ dashboard to authorize your website domain:
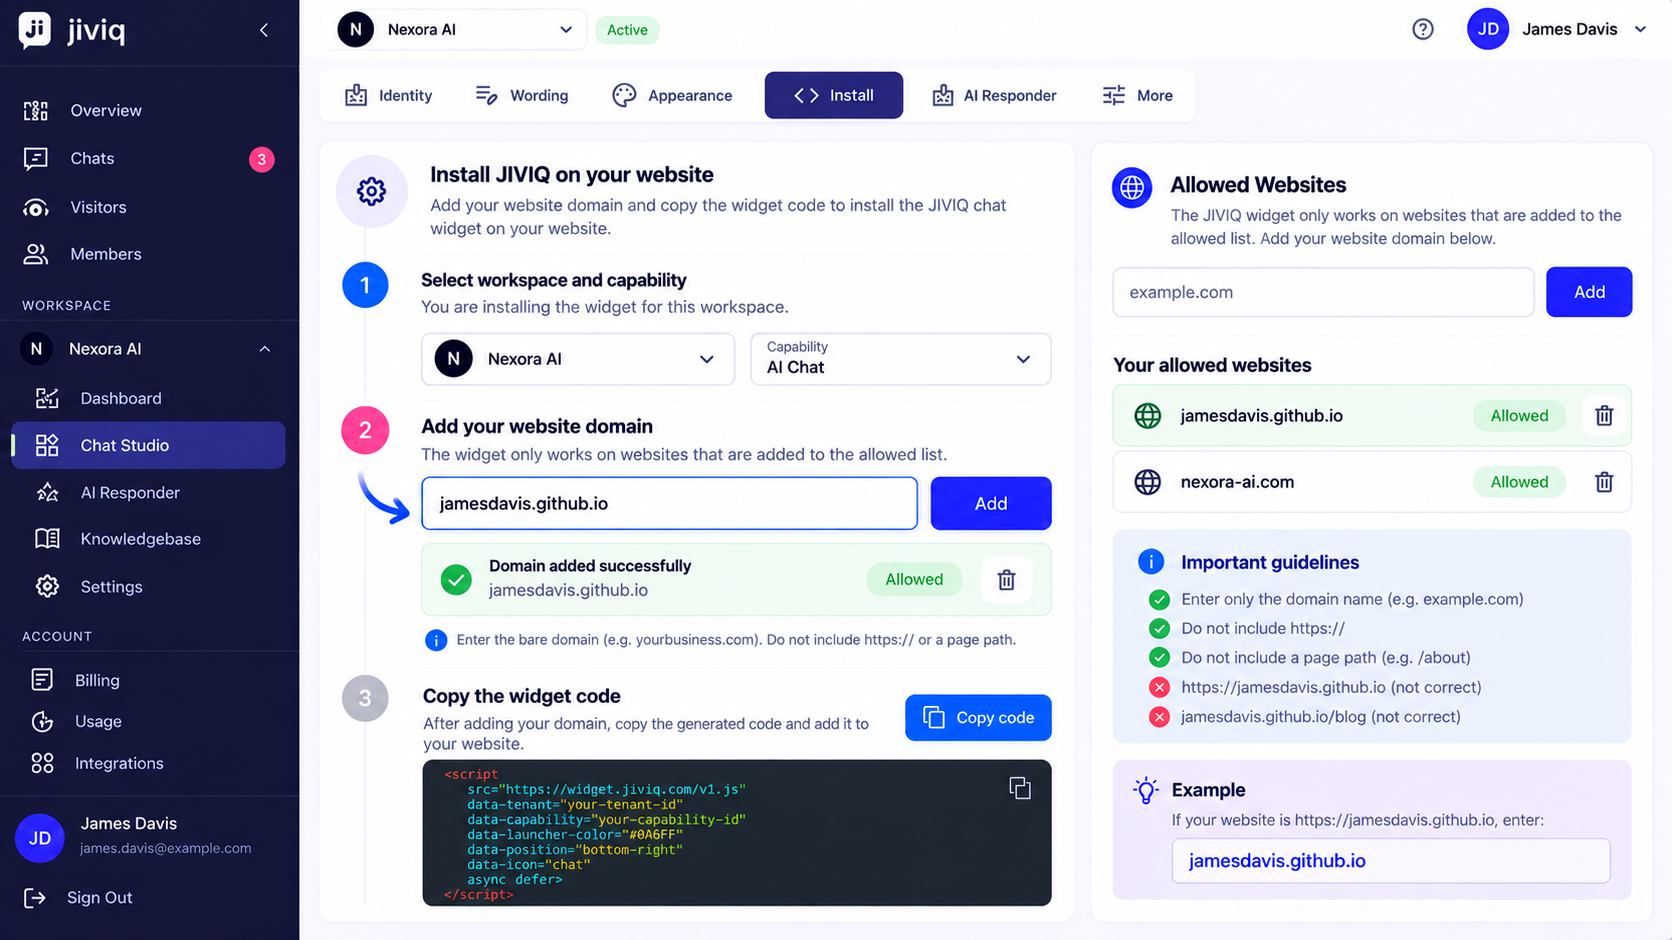
Log in to app.jiviq.com, select your active Workspace, click Chat Studio in the left sidebar, and select the Install tab.
Scroll to the Allowed Websites card. This section displays all domains currently authorized to load your chat widget and includes an input field for adding new sites.
Type your bare domain into the input box (e.g., yourdomain.com or jamesdavis.github.io for GitHub Pages). Do not include https:// or trailing slashes.
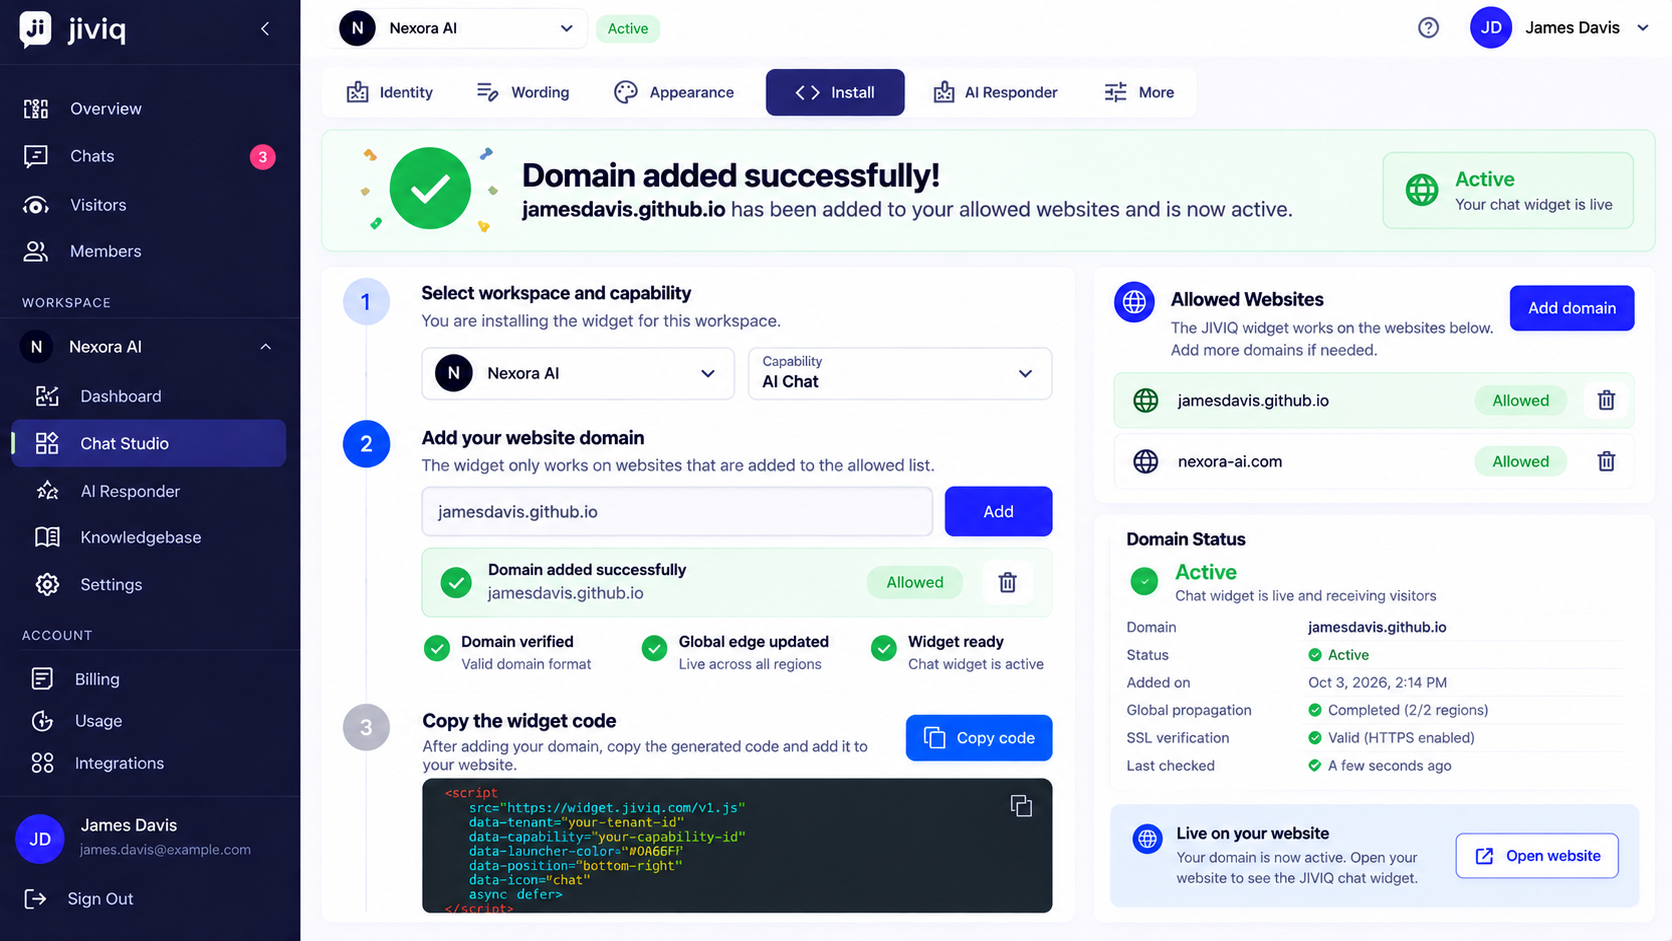
Click the Add button. JIVIQ immediately validates the format, adds the entry to your authorized table, and displays a green Active badge next to the domain.
5. Wildcard Subdomains & Staging Sites
For businesses running multi-environment pipelines or multiple brand subdomains, JIVIQ supports flexible wildcard domain matching:
Wildcard Subdomains
Use *.yourdomain.com to authorize every subdomain under your apex domain (e.g., app., blog., shop.) automatically.
Dual Domain Coverage
Add both yourdomain.com and www.yourdomain.com to guarantee uninterrupted uptime across URL redirects.
6. Common Mistakes & Error Resolution
If your domain registration fails or the widget does not appear on your live website, check these common validation errors:
"Invalid domain format"
Cause: You included https://, http://, or a subfolder path like /contact in the field.
Solution: Remove protocols and paths. Enter only the host domain: example.com.
"Localhost is not supported"
Cause: Entering localhost, 127.0.0.1, or a local network IP address.
Solution: Deploy your test project to a public test domain (e.g., GitHub Pages, Vercel, Netlify preview) to test JIVIQ live.
"Domain Not Authorized"
Cause: The live webpage address differs from the registered domain (e.g., website redirected from apex to www).
Solution: Check the browser address bar on your live site and ensure the exact domain is added in JIVIQ.
Missing "Add Domain" Button
Cause: Your user role in this workspace is Member or Viewer, which does not have security admin rights.
Solution: Ask your Workspace Owner or Admin to add the domain or upgrade your role.
7. Visual Interface Walkthrough
Review these visual interface references showing the domain allow-listing process inside the JIVIQ dashboard:
8. Frequently Asked Questions
Explore commonly asked questions regarding domain allow-listing, subdomain wildcards, and origin verification:
JIVIQ enforces strict origin allow-listing for security. If the widget script is loaded on a website that has not been explicitly authorized in your Workspace settings, the widget will refuse to initialize, preventing unauthorized third parties from hijacking your AI assistant.
A domain is the bare host address (e.g., example.com or jamesdavis.github.io). A URL includes protocols (https://), ports, subfolders, or page paths (e.g., https://example.com/pricing). JIVIQ requires ONLY the bare host domain.
Standard workspaces allow registering your primary production domain plus staging/subdomains. Multi-site workspaces on higher tiers can authorize unlimited domains under one umbrella.
No. Never include http:// or https:// in the domain input field. Entering a protocol will trigger a validation error. Simply enter your hostname, such as mycompany.com.
No. Do not include page paths, slashes, or file extensions. Adding mycompany.com authorizes JIVIQ across all pages and sub-paths of that entire domain automatically.
For GitHub Pages (like our Nexora AI tutorial at https://jamesdavis.github.io/nexora-ai/), you enter the host domain jamesdavis.github.io without the repository sub-path /nexora-ai/.
Yes. Adding *.mycompany.com allows the widget to run across all current and future subdomains (e.g., app.mycompany.com, blog.mycompany.com, store.mycompany.com) without adding each one individually.
If you do not use wildcard notation, we recommend adding both your apex domain (company.com) and the www subdomain (www.company.com) to guarantee uninterrupted coverage regardless of user redirect rules.
Yes. Adding staging or QA domains allows your development team to test the chat widget in pre-production environments before deploying live.
For security integrity and reliable cross-origin resource validation, JIVIQ widget security requires public domain verification. Localhost and private intranet IP addresses cannot be added to production allow-lists.
Only team members with Workspace Owner or Admin permissions can register new domains or delete existing authorized websites from the Workspace settings.
The widget will immediately fail to load because their website domain is not in your Workspace allow-list. Your AI context, chat history, and quota remain 100% secure.
This happens if you pasted a protocol (https://), a trailing slash (/), or a page path (/contact). Strip everything except the bare domain (e.g., site.com) and try again.
Check if your site redirects visitors between www.yoursite.com and yoursite.com. Ensure the exact domain displayed in the browser's address bar is included in your JIVIQ allow-list.
Domain authorization propagates across JIVIQ's global edge network instantly. Once you click Add and see the green status tag, the domain is immediately active.