How to Create a Knowledge Base in JIVIQ
A clear walkthrough on setting up a Knowledge Source for your business in JIVIQ. Learn how to access Settings → Knowledgebase, use the Add knowledge source action, name your repository, and assign it to your workspace.
What Is Knowledge Base?
Grounding principles & core concepts
Review →Create Knowledge Base
Add knowledge source in Settings
Currently ReadingImport Website
Connect live web pages & sitemaps
Up Next →Upload Documents
Index PDFs, Word docs & guides
Explore →Refresh Content
Re-sync website changes on demand
Explore →Connecting to Your Installation Journey
You've already installed the JIVIQ widget and verified it on your website using our Verification Guide. Now you're ready to give the AI the information it needs to answer visitors.
When your chat widget was first verified, it was connected to your website, but it didn't yet have business facts to speak from. Setting up your Knowledge Base provides the private information repository that your AI assistant will reference during live conversations.
2. Important Terminology: Knowledge Base vs Knowledge Source
In the JIVIQ dashboard, you will not see a button labeled "Create Knowledge Base". Instead, the interface uses the button "Add knowledge source".
Understanding the Concept
You'll create a Knowledge Source inside the Knowledge Base. Think of the Knowledge Source as the place where JIVIQ keeps a specific set of information for a Workspace.
The Knowledge Base is the overall feature area where your company's information is organized. A Knowledge Source is the actual container where you connect your website pages or upload your business documents.
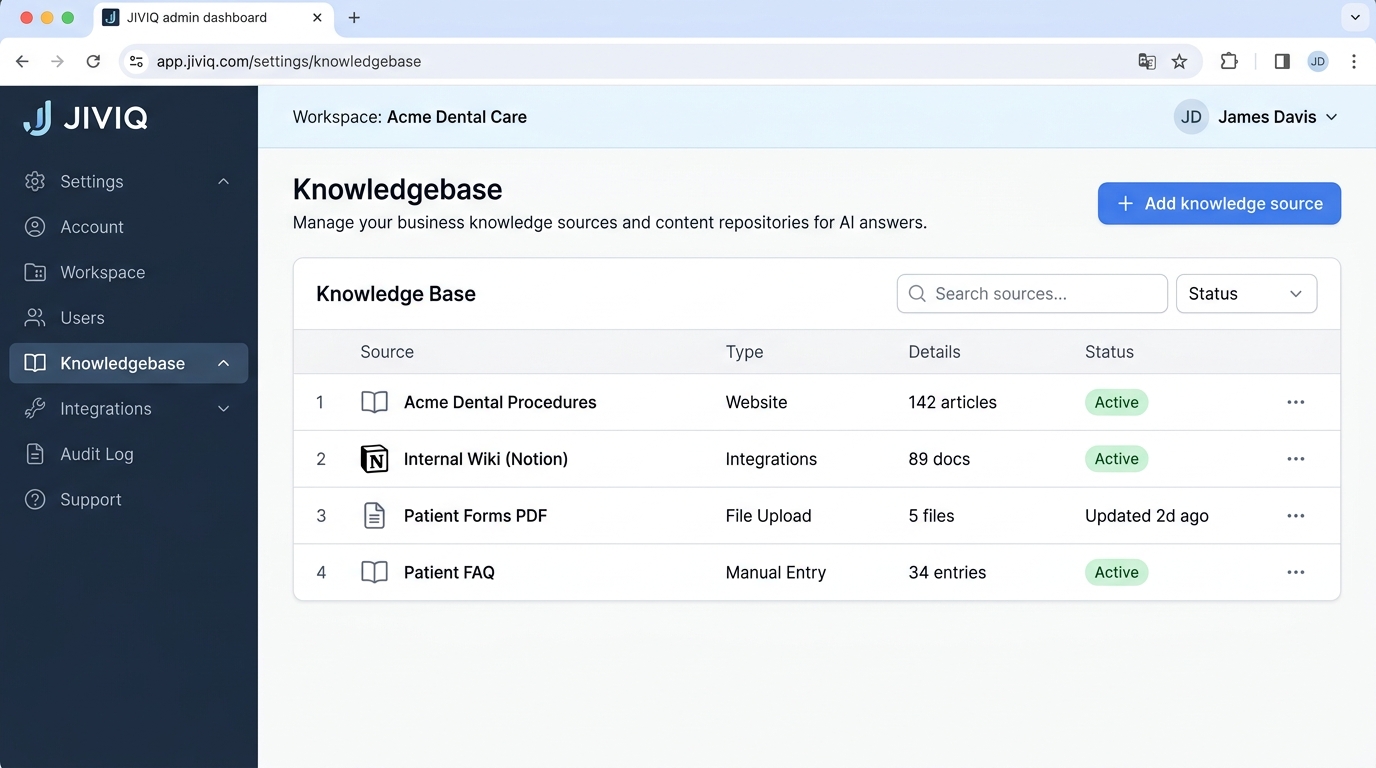
3. Step-by-Step: How to Add a Knowledge Source
Creating a new knowledge source takes less than a minute. Follow these 8 straightforward steps:
Sign In to the JIVIQ Admin App
Open your browser and navigate to app.jiviq.com. Sign in with your owner or admin account credentials.
Open Settings
From the left navigation bar, locate and click the Settings menu option.
Open Knowledgebase
Under the Settings section, click on Knowledgebase to open your knowledge management dashboard.
Click "Add knowledge source"
Click the primary blue + Add knowledge source button located in the upper-right corner of the page.
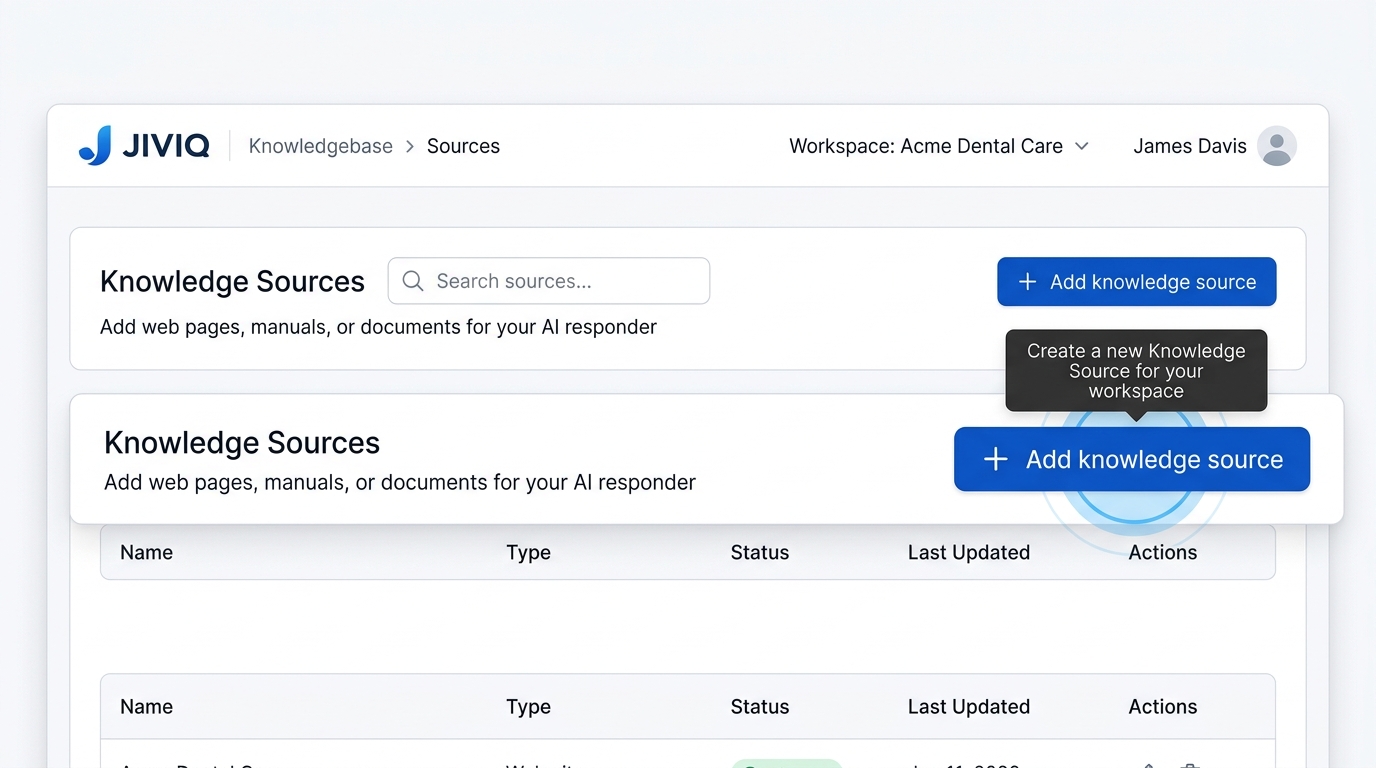
Give the Knowledge Source a Clear Name
In the modal that appears, enter an identifiable name in the Knowledge Source Name field (for example, Website Content).
Select the Workspace It Belongs To
From the Workspace dropdown menu, confirm or choose the workspace you are configuring. If your account only has one workspace, JIVIQ selects it automatically.
Open the Knowledge Source
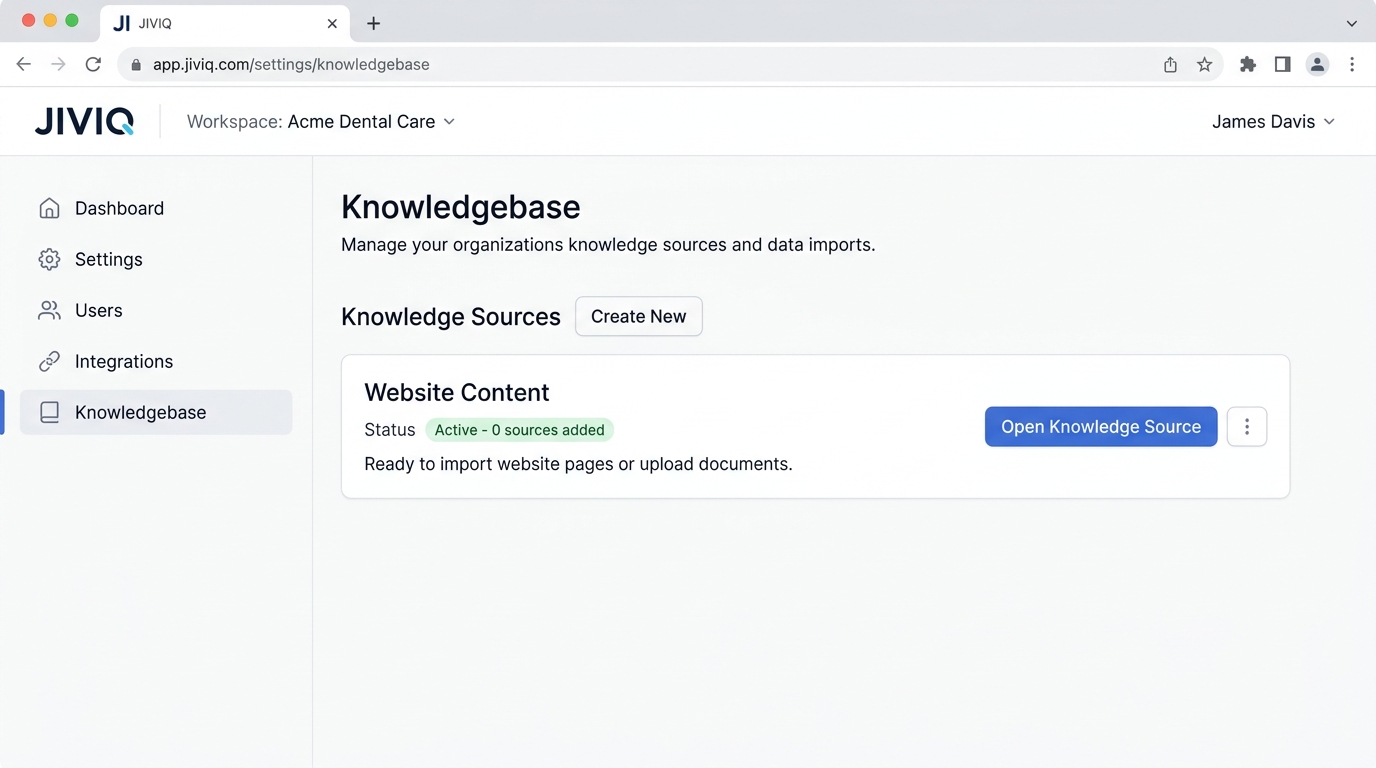
Click Create Source (or Save & Continue). In the list of sources, click Open Knowledge Source on your new card.
Add Knowledge via Website Import or Uploaded Documents
Inside the source, proceed to connect your live website pages or upload business PDFs, Word docs, and FAQs to teach your AI assistant.
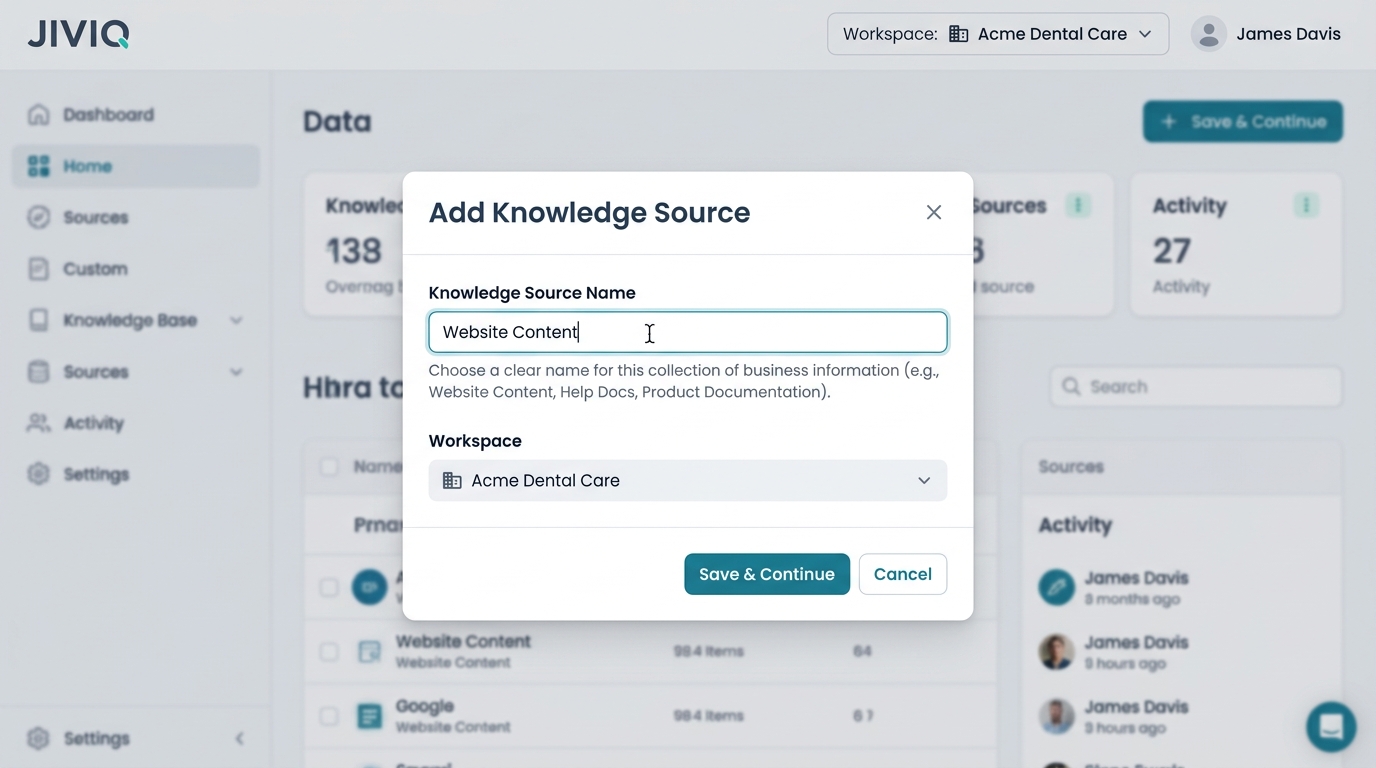
4. Choosing a Clear Name for Your Knowledge Source
A good name helps your team immediately understand what kind of information is stored inside the source. You are free to choose any name that fits your workflow. Here are human, practical examples:
Website Content
Use this when importing your public website domain, blog articles, services, and pricing pages.
Help Docs
Perfect for your public customer help articles, troubleshooting steps, and onboarding guides.
Product Documentation
Great for uploaded technical manuals, PDF product catalogs, and detailed feature breakdowns.
Website FAQ
Ideal for direct question-and-answer pairs covering office hours, return policies, and common inquiries.
Names Are Flexible
These names are simply helpful examples. You are not required to use these specific terms. You can name your source after your company department, location, or product line (e.g. Acme Dental Downtown).
5. Assigning Your Knowledge Source to a Workspace
Every Knowledge Source is linked to a Workspace. This guarantees that your AI assistant only references the knowledge intended for the specific website or business brand hosted in that workspace.
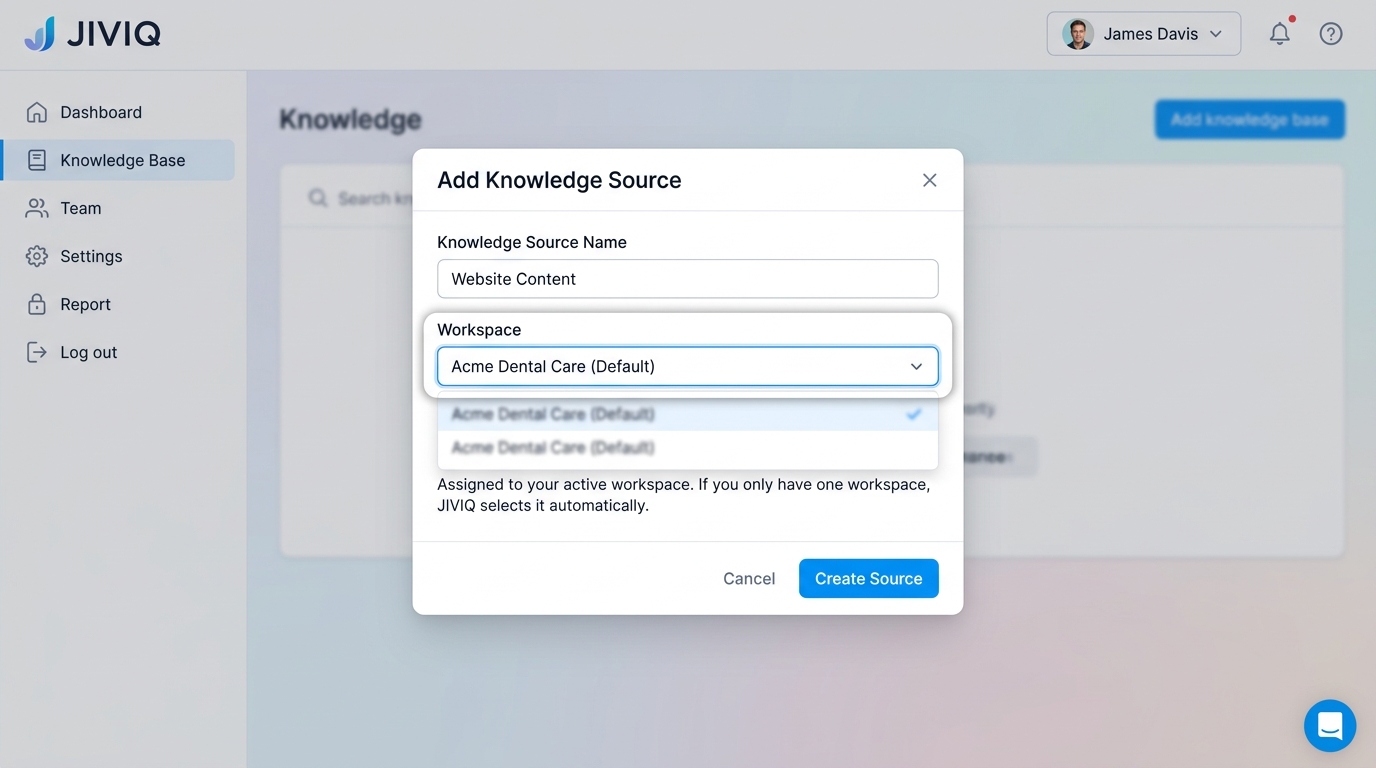
If your JIVIQ account has only one workspace, JIVIQ automatically selects it for you so you can move forward immediately.
If you run multiple distinct businesses or client sites, pick the exact workspace where the corresponding chat widget is embedded.
6. Who Can Modify the Knowledge Base?
Because the Knowledge Base directly controls what your AI assistant tells customers, modifying sources is restricted to administrative team members:
7. What to Do Next: Populating Your Knowledge
Now that your Knowledge Source is created, the next step is adding your business facts into it. You have two primary methods:
8. Questions About Creating a Knowledge Base
Browse questions across 5 categories to help you set up and organize your knowledge sources:
In the JIVIQ admin interface, navigate to Settings → Knowledgebase and click the blue '+ Add knowledge source' button in the upper-right corner. You create a Knowledge Source inside your Knowledge Base.
The Knowledge Base is the entire knowledge management section of your JIVIQ account. A Knowledge Source is an individual repository or collection of business facts (like website pages or uploaded manuals) assigned to a specific workspace.
Yes. You can create multiple Knowledge Sources to organize different types of company information, such as having one source for public website pages and another for internal support manuals or product catalogs.
During creation, JIVIQ provides a Workspace dropdown menu where you select the target workspace. If your account only has a single workspace, JIVIQ automatically selects it for you by default.
JIVIQ automatically pre-selects your active workspace in the creation modal, saving you time. You simply confirm the choice and proceed to name your knowledge source.
Each Knowledge Source belongs to a specific workspace to maintain strict data separation and ensure chat widgets in other workspaces never quote unrelated business facts.
Only Workspace Owners and Administrators have permission to add, configure, rename, or delete Knowledge Sources. This security guardrail prevents unauthorized changes to what your AI says.
Support agents can see which sources and documents were referenced when reviewing chat transcripts in the Inbox, but they cannot access Settings → Knowledgebase to add or edit sources.
Go to Settings → Users in your JIVIQ dashboard and upgrade the team member's role from Agent to Administrator or Workspace Owner.
Choose a simple, human-friendly name that describes the content inside, such as 'Website Content', 'Help Docs', 'Product Documentation', or 'Website FAQ'. These are just helpful suggestions; you can name it anything you prefer.
Yes. You can open your Knowledge Source settings at any time and edit the name without disrupting any active live customer chats or existing indexed pages.
No special format, naming convention, or prefix is required. Use plain names that your team can easily recognize when managing multiple sources.
After creating the source, open it by clicking 'Open Knowledge Source'. Then begin adding business facts by importing your website pages or uploading PDF and Word documents.
When a Knowledge Source is newly created with 0 sources added, the AI has no facts to draw from. It will politely inform visitors that it doesn't have the requested details until you import pages or upload docs.
The Knowledge Source is created instantaneously. As soon as you complete the name and workspace modal, the source is active and ready to receive your content.